Jan 19, 2024

Better Backyard Bird Photography

 Better Backyard Bird Photography


Taking photos of birds in your backyard can be pretty boring, especially those shots of birds perched on a feeder. To make the pictures seem more natural you can add a staging perch for the birds to stop before they go to the feeder

Change this

To This


If your feeder is on a pole or decorative shepherd’s hook, you can easily add a staging perch by finding a sturdy branch or a thin piece of driftwood and attach it to the pole.  There are several ways you can attach the branch, but the easiest way to do it is to with a U-Bolt. It looks like this:


This is a U_Bolt. They come in various sizes. The size you need depends on the thickness of the branch and the post or rod that holds the feeders.The U-bolt shown here is 2 ½ inches wide and 4 3/16 inches deep. I used a U-Bolt that measured 2-inches wide, but they are available in smaller and larger sizes. You don’t have to purchase stainless steel. Zinc plated is fine.


It’s attached over the branch and around the post and tightened with a box wrench.

Here’s what it looks like after it is clamped to the post:

Tighten the u-bolt until the branch no longer slides down or twists around the post. Also, make sure the background doesn’t have any distracting details. 


I used a 100-400 mm telephoto zoom lens and sat about 10-15 feet away from the feeders. The background became completely blurred at f5.6 as in the blue jay and red-wing blackbird images.


I found that as the birds got accustomed to my presence, Icould closer to them 


This little bird posing trick takes your images from these two following examples


to a much more natural looking picture


(Note: This shows an earlier location of the feeder, but the background is too close and includes more detail than I wanted. This f8 @ 1/640 sec. I also could have set the ISO to 200 and reset the F stop to 5.6 and probably the bokeh would have been much better.)


Jan 17, 2022

"Should you take that picture?"

I’ve been reading and viewing photography books over the last few weeks. One book published by Aperture, Photo No-No’s edited by Jason Fulford really got me thinking about issues around the practice, profession and pastime of photography. The subtitle is “Meditations on What Not to Photograph.” More than 200 contributors -- photographers, editors, museum curators, gallerists -- chimed in what they wouldn’t photograph. The comments are as short as a sentence or two and as long as a two-page formal essay.


The no-no’s include never taking photos of abandoned shopping carts, anyone who says, “Make Me Look Good,” beige, empty stairs, ghosts, people sick in the hospital, pregnant selfies, sewer grates, someone talking on a cell phone below a billboard of someone talking on a cell phone, roadkill, trash heaps and used-car lot flags. There is a mixture of serious and facetious commentary and confession -- so many confessed to having once, or often,  committed the photography “no-no.” 


It’s fun reading.


It’s now ten years since I traveled to India and Tibet. Many of the pictures I captured there are among the most colorful and exotic of the more than 150,000 images in my catalog. However, some of the images posed ethical challenges. I refrained from taking pictures of the crippled and the physically deformed. And there were plenty that we saw begging on the streets. In Varanasi we witnessed many cremations and grieving families. I did sneak a few photos because of the spectacle of fire and grief along the shore of the Ganges. The light from the funeral pyre was irresistible and the illuminated faces of grieving family members was a tableau made for a photographer. I still feel ambivalent about those pictures and I have never shown them to anyone. 


I went to a funeral here in the New York area in the pre-COVID era. The deceased was in an open casket. I noticed at least two people sneak smartphone pictures of his lifeless face. I imagined Weegee-type images of victims of street homicides, or like those wild west pictures of dead outlaws whose corpses were photographed to show that they were really dead.  Does anyone ever print and frame these shots and show them to visitors? “Oh, here is a photo of Uncle Bill in his casket! Doesn’t he look good?”


In Photo No-Nos there is a short recollection by Kyoko Hamada. (https://www.kyokohamada.com/about) While she was an art student in NYC, her father falls seriously ill in Japan. She makes several trips to see him during his terminal illness but she struggles over whether she should photograph him in the hospital during the last months of his life. After her visits she would walk the surrounding neighborhood taking street photos. On one occasion she saw an unconscious man lying on the sidewalk and a few police officers and thought it would make for an interesting picture. She hesitated considering the scene and the man’s situation and walked past. But after a few steps, she reconsiders and walks back, steels herself and clicks the shutter.  At that moment she hears someone quietly say, “There’s a photograph to take and there’s a photograph not to take. Which one do you think this is?”


He suggests that she take a few photos of him instead. After all, he says that he’s much better looking than that poor soul who has fallen unconscious on the sidewalk. She takes a few street portraits and then moves on. However, she’s left to wonder what this man would say about taking a photograph of her dying father in a hospital bed plugged in to monitoring devices with oxygen and drainage tubes coming out of his body. 


“There’s a photograph to take and there’s a photograph not to take. Which one do you think this is?”


If you’re a serious photographer or a photo enthusiast, this book will make you think about the pictures you take or the ones you view at a gallery or museum. 


### 


Jan 7, 2017

Printing photos improves your photography


At this time of year there are so many “How to Improve your Photography” blog posts out there, that another one risks getting lost in the mélange of suggestions found in publications and on the Internet. However, this blog, infrequent as it is, was started as an exploration of my photography adventure and what I learned or thought about while on that journey. Here are my three suggestions: 1-Get a good tripod; 2-Start a photography project; 3-Print your images larger than 8x10.


Nothing original here. We’ve all heard these suggestions over and over again, but I sometimes fail to follow my own advice. I still argue with myself about dragging along a heavy tripod on a day I just want to go on a “walkabout” with my camera. And, because I have visual “rabbit ears,” I am easily distracted, I seldom stick to a single theme for any length of time. Last year it was twilight. Now I’m considering doing water drops. Next may be astrophotography or butterflies.


However, printing my images in a larger than average size, has made me more critical, thoughtful and appreciative of a good image. Ink and photographic paper are expensive. Now I ask myself, “why” am I taking the image? Am I simply documenting the scene? What should I include or exclude from the frame? What would make the photo a “wall hanger?”


This may be a sad thing to say, but I’ve taken tens of thousands of images and only of a few hundred are worth printing. For instance, I took about 150 images of my visit to the Great Wall of China in 2012. There are only a couple that I would waste any ink or paper on. It was crowded. It was later in the day so the light was pretty poor and there was a haze of pollution in a cloudless gray sky that would take extensive work in Lightroom and Photoshop to correct. That was five years ago.


Recently I was asked to take some photos of a historic house on the North Fork of Long Island. This would be an image that would end up as a print. This changed how I approached taking the picture. I scouted the location capturing pictures on my iPhone, but when it was time to get the actual shot, I brought the “big bertha” tripod, and planned a series of shots for this project to be taken around twilight and from various angles that might emphasize the character of the house, its proximity to the Sound, and its history. I had the luxury of having permission to go back to the site several times over a couple of weeks.

Each time I came home I looked at the images and asked myself which of them would look good as prints.  In the end I chose two out of about 25 files.  There's something about a print that makes flaws more noticeable than when viewing the image on screen.


From start to finish, the goal was to capture an image that would make a great print. That changed how I looked at the scene and how I captured it. It improved my photographic process.

###

Mar 8, 2016

Can classic art inform our photography?


For about a year, I’ve been paying more attention to art--classic and modern painting--to see how it can inform my photography. I use a few apps on my iPhone, Art Authority, Artsy, and WikiArt, and visit museums with a couple of goals in mind: “What can I learn about composition, color and light from the past artists? How will they inspire me to try something new with my camera?”

The history of the visual arts is replete with examples of paintings that achieve a “photographic” look and photographers who take pictures that end up looking like paintings. Painters have the luxury of creating subjects, light, color and composition out of their imagination, while photographers can only record the reality in front of them. However, once they get past simple snapshots, they regularly manipulate the way a camera sees things by using artificial light, filters, software, depth of field or lens distortion to try find a more “artistic” depiction of the subject.


The influence of painters in studio portraiture is obvious. For instance, Rembrandt lighting can be recreated and repeated in studio settings. Rembrandt lighting is a studio lighting scheme that shows half of the model’s face completely lit while the side farthest from the artist is only partially illuminated. To be precise, the dark side of the face has a short triangle of light on the cheek. See the 17th Century selfie of Rembrandt that illustrates this.


20150611_0082.jpg


Here is a portrait I took of Albie DiKirillis who lives in East Marion. Notice the triangle of light on the darkside of the face. One light source at 45 degrees from the right using a Speedlight and umbrella. I lit the background with another Speedlight.

I’m always struck by the lighting in Caravaggio paintings. The play of light and deep shadows, called chiaroscuro, adds drama and depth to the scene. The direction of the light leads the eye into the painting and helps follow the narrative of the subject matter.

Here’s a sample image The Calling of St. Matthew. Pay attention to the direction of the light and the deep shadows.


You would be hard pressed to discover and capture a scene with this kind of dramatic lighting with your camera, but you could easily create it in a studio.

I’m still working on recreating this kind of lighting scheme in my photography. Don’t be confused by the subject matter, just look at the emphasis on the direction of the light and the way the light and shadows punctuate the scene. It’s not a giant leap to see how this influences photographers who shoot low key images and film noir cinematographers.


Here’s an early morning photo of two women and a child in India. They slept on the floor in a train   station waiting for the next morning’s train.


 As a landscape photographer, I am interested in the historical depictions of landscapes. They generally fall into two categories: those that show nature in a realistic way and those that depict it in some idealized way. I notice also that earlier landscapes include human and animal activity in the scene, and are really used as backdrops for some Biblical or mythological story or historical event. Every rock, mountain and tree is added by the artist, while more modern 19th Century landscape artists painted actual scenes and locations. This coincided with the invention of photography and the expansion of the subjects that fall under the landscape umbrella. Think of things like urban and industrial landscapes.

Ansel Adams is the dominant photographer who captured the beauty (in black and white) of the American west and was instrumental in preserving it by promoting our national park system. He floated the concept that we must preserve wilderness.


The grand western landscapes of Albert Bierstadt who worked during the last half of the 19th Century are part of that history despite the Romantic drama of his work. Look at his rendition of western American landscapes you can learn a lot about color, light and composition studying something like his Liberty Cap, Yosemite, 1873: (Ansel Adams produced his Monolith, the Face of Half  Dome in 1927.)

Of course, painters have the luxury of creating the “light” in their art while photographs have to deal mostly with what’s available. And, painters can create drama whenever they want to. Photographers have to work with the limitations of cameras, lens, films or sensors and available light.

Today, in the digital era, we use software to “dodge and burn,” and make other creative adjustments to contrast, color, luminosity and white balance. In fact, we can “paint” on the adjustments to very specific parts of an image to “create” contrast, deepen shadows, alter tonality and clarity. Technology and photography have moved us closer to the tools that basically were only available to painters. Look at all the apps out there that can make your photographs look like a watercolor, a poster or an oil painting.

If you go to WikiPedia you can look up the Hudson River School of landscape painters of the 19th Century. Take a look of the works of Albert Bierstadt, Frederic Edwin Church, Martin Johnson Heade and Edward Mitchell Bannister. Heade is of particular interest to me because of his more than 100 depictions of wetlands and meadow. Here’s my rendition of a winter wetland on a foggy day:


I also use an iPhone and Android app called Art Authority that references more than a 1,000 of the western world’s major artists from historic to present times. You can look up works of art by artist, period, style and location. For instance, for location, I looked at what is exhibited at the Pinacoteca Vaticana and even what was being displayed at the Adirondack Museum. It’s a useful app that provides easy access to the art of the western world.

Ultimately, photographs are not paintings. I don’t think that’s how most people approach "taking" pictures. Many don’t even think about photographs as “art.” But, if you, as a photographer, admire the great masters of painted art you should pay attention to their use of light and shadow, their composition and try to capture some of those qualities in your camera and prints. That takes some understanding of how your camera works and how you can manipulate the technology to get what you want. After all, we have several thousand years of art history and our photography now has become part of that continuum of creativity.


###

Jul 11, 2014

Flower Photography: Selective Focus


“A rose is a rose is a rose…” said Gertrude Stein, but if you feel that way about flower photography, maybe it’s time for a new way to see these blooms through your camera’s eye.

Summer flowers inspire photographers with their colors, shapes and beauty. Even the most casual photographers and smartphone users can’t resist snapping a shot or two when they set eyes on them. Seeing a beautiful field of flowers just makes you happy and want to capture the moment with your camera. But many photographers come home disappointed with the images or quickly get bored with the same images of roses or daisies every year. But changing your point of view and getting up close and personal can foster excitement and interest in the images you create.
The photographer who opened my eyes to viewing flowers differently through a camera lens is Allen Rokach. Check his portfolio of flower photographs on his website and pay attention to what he does with his camera. He’s either up close and really personal with an orchid or he captures abstract rivers of color in a field of wildflowers. He masterfully plays with the translucency of red poppy petals or purple blue bonnets. Even his rose and sunflower photos are not cliche depictions.

I don’t have the post-processing skills of Rokach to create the same kind of impressionistic depictions of summer blooms, but here are some photo techniques that can help your flower photographs get noticed.


When the Backstreet Boys say, “Get down, get down and move it all around...” they’re not talking about your camera. But it’s good advice for flower photographers. Promise yourself that you will resist taking photographs of flowers while looking down at them. Get on you knees, lay down, roll in the grass, get dirty and take a look from this new perspective before you snap a photo.


Take the camera off auto and get used to manually focusing and setting aperture. Things can change a lot when you control the aperture and focus. For instance, aperture helps expand or limit depth of field, while manually focusing allows you to select your focus point.  

Use reflectors to bounce light onto the subject. A gold reflector will add warmth. A silver reflector--even a small piece of aluminum foil will brighten the scene and fill shadows. I’ve used a piece of white foam board to add punch to a flatly lit blossom.


On camera flash is taboo, but if you get a TTL cord you can add flash under, behind or on the side of your subjects. Modern flash systems allow you to control the light they emit so effects can be very subtle. You’ll be amazed how backlit petals often radiate beauty as if through a prism.


Get as close as your equipment allows. Focus on the pistils and stamens, or just the edge of a petal with the rest of the flower remaining a suggestion. 


Your photos can evoke a field of flowers with patterns and colors.Think about making your image hint daisy, or sunflower or orchid. Don’t get bored with zinnias or hydrangeas, just get up close and selectively focus on where the light and color interact.
And finally, how do you do all this stuff and hold the camera, too? Well, bring that hated tripod with you. Now, when you select a subject you want to photograph, you can focus tightly on it while directing your off-camera TTL flash in one hand and your reflector and remote shutter release in the other. Or, you can set the timer for the shutter release to five or 10 seconds which should give you enough time to set things up before the shutter clicks.

Bright overcast days are best because the light is fairly even and you can also juice things up with a spray bottle of water to add reflective surfaces. 

Have fun!


Apr 7, 2014

Travel Photography: Making Better Equipment Choices

Historically, travel and photography are so intertwined that many of the earliest images ever taken depict 19th century travel destinations from around the world. Today you rarely see anyone traveling who doesn't take at least some pictures, especially in this age of portable, easy to use cameras, smartphones, Facebook, Flick'r and Instagram.
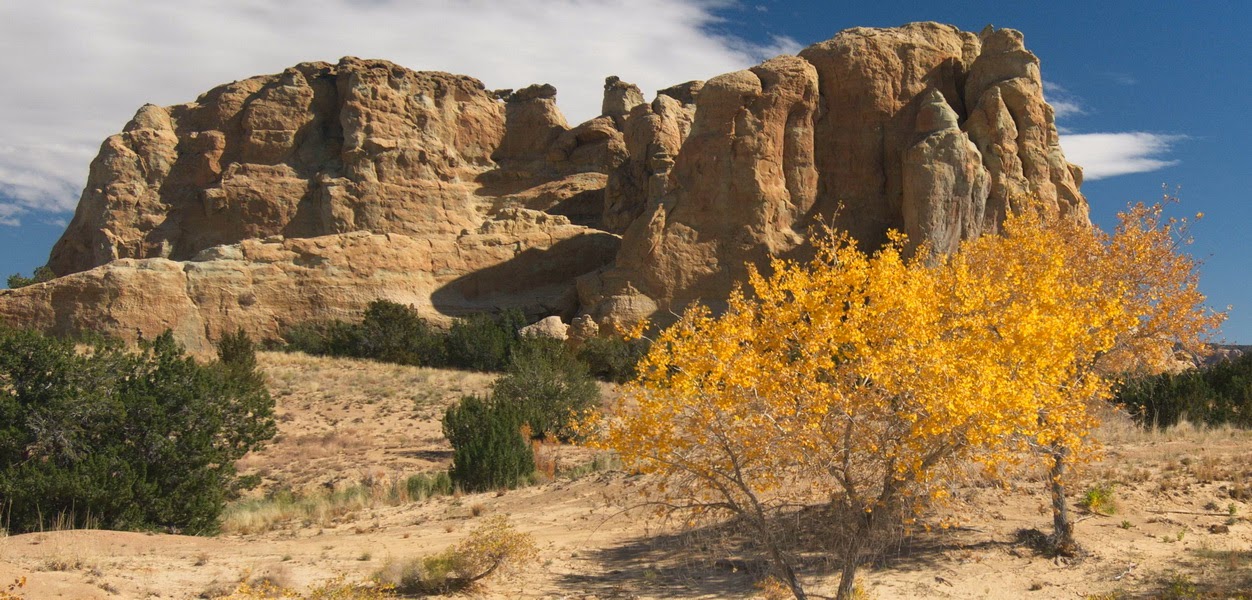
Mesa in New Mexico

But coming home with decent images that depict what you experienced is not as easy as casually tossing a camera in your carry-on bag. It takes some preparation and familiarity with the equipment, some idea about what you may encounter on your trip and how you plan to show your friends the images.

If you use a smartphone, you should make room for your pictures by clearing the photo memory in the phone. You may also want to have some backup space in the cloud for the excess. If you use a point and shoot camera you should decide before you leave the size and quality of the images you’re going to take, how many extra memory cards to bring and how to store and save those precious photos. And, for those who use DSLR’s with interchangeable lenses, not only do you have to think about memory cards, storage and backup, you also have to consider what lens or lenses to bring and how to carry a tripod. Yes a tripod!

This was too heavy a load for me at that altitude
I took a trip to Peru and carried one body, four lenses, a portable backup/storage drive, six memory cards, battery chargers, extra batteries, electric outlet adaptors, a small international power strip, 1.4x tele-extender, a Kirk ball head, a Gitzo tripod, variable and neutral density, and polarizing filters. The lenses were 14-24 mm f2.8, 24-70mm f2.8, 70-200mm f2.8 and a 105mm f2.8 macro. I had all the bases covered for viewing sea lions and blue-footed boobies on Ballestra Island, condors in Colca Canyon and architecture in Arequipa, Lima and Cuzco and enormous landscapes in the Altiplano. I got great shots, but by the end of the trip, in Machu Picchu, I couldn’t carry all that gear on my back in the rarified atmosphere of the high altitudes. On the second day, I took a chance and checked my camera bag and all the gear at the entrance of the site and just took the camera with the wide angle 14-24mm lens.  


It’s easy to say that you’re going to pack light, but it’s a lot harder to do. I used to use a 18-200mm lens for travel but that lens just wasn’t sharp and fast enough for the kind of shooting I like to do. People talk about the 24-105mm f4 lens as a good choice, but I like shooting wide open sometimes and f4 just doesn’t cut it. So here’s the kit I took to Hong Kong: 24mm f1.4, 50mm f1.4 and 105mm f2.8 and one body. All prime lenses. You could walk around all day with that load.

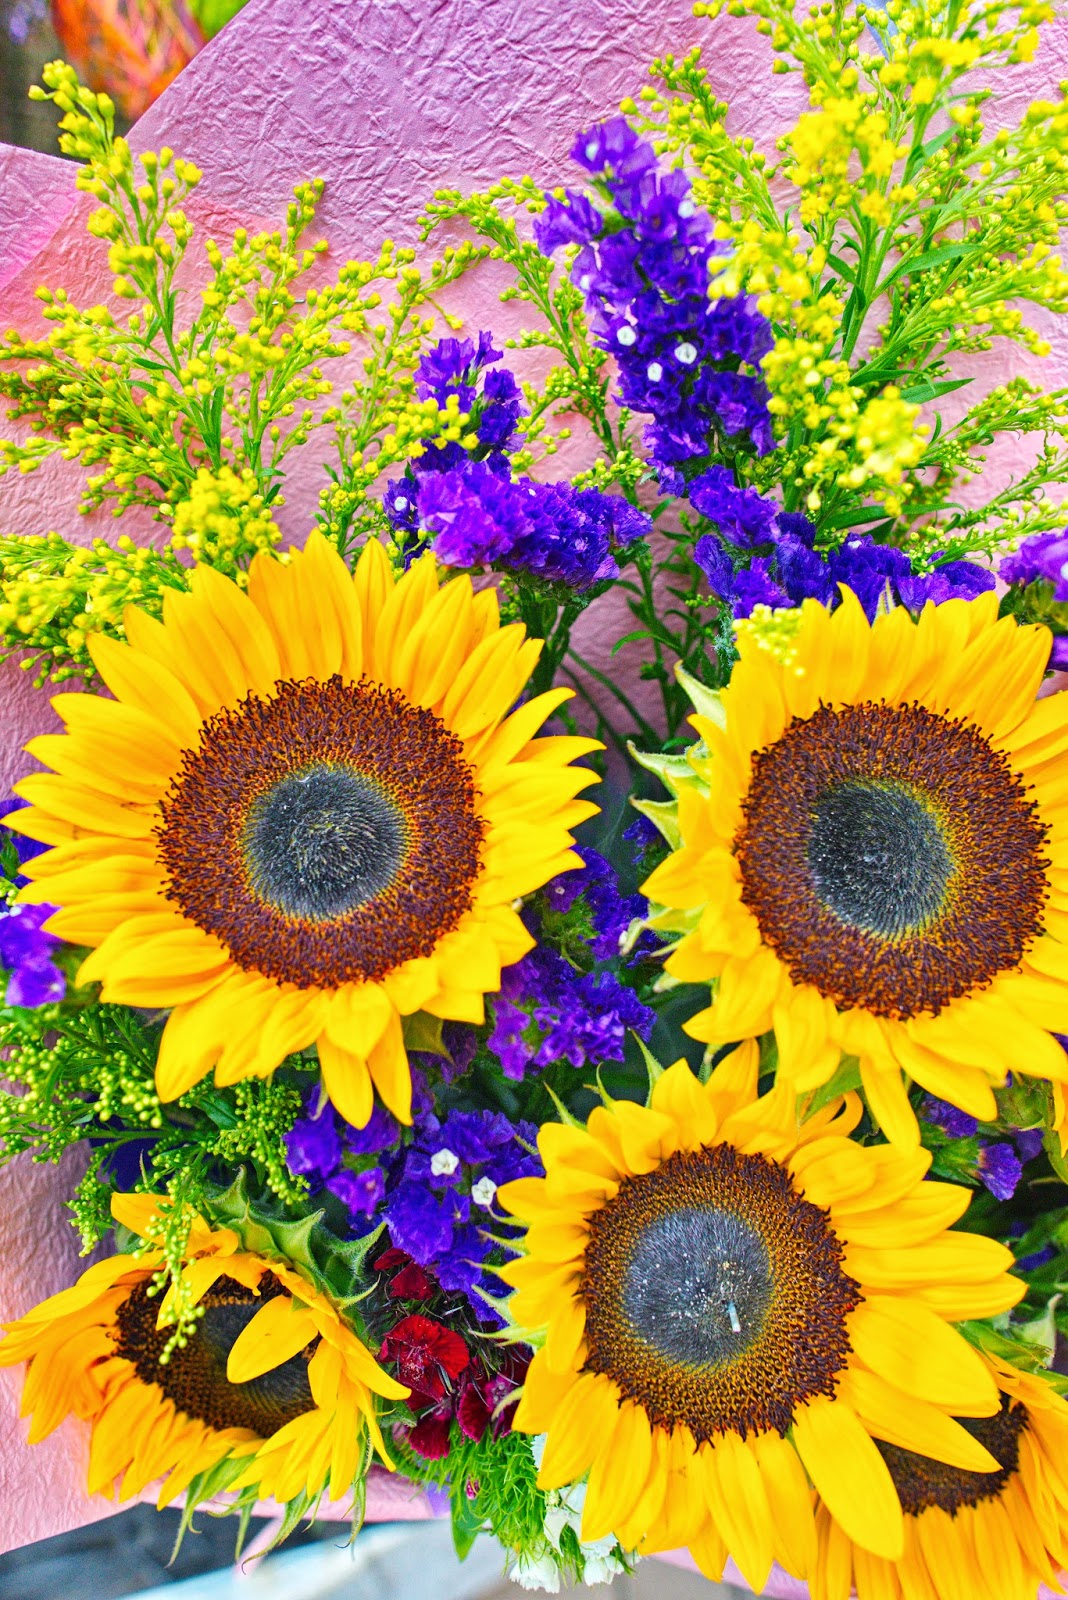
Hong Kong flower market arrangement


Now I haven’t settled on that combo yet for other trips, but for urban street, architecture and landscape photography it seems to work. Some travel photographers take an 85mm f1.8 as a lightweight short telephoto, portrait lens. This sounds like it could be a good street portrait photography lens.

So what’s the answer for your next trip? There isn’t a simple solution. But here is a way to make an informed decision. Go online to Google Images and type in the names of the various locations you are going to visit during your trip. For instance, if you search for Hong Kong, you quickly discover that there is no need for a telephoto lens. You probably could get by with just a 35mm lens for all your images.  There is more variety needed for Vietnam and Cambodia as there are large vistas and urban /street environments. A short zoom lens in the 24-70mm range would do very well. If you’re going to a location that includes urban locations and wildlife viewing like South Africa, then consider adding the 70-200mm and a 1.4x and 2x tele-extender, or a 200-400mm zoom. Remember you have to get it all on the plane in your carry-on bags. Forget about checking your valuable equipment and trusting the baggage handlers to treat it gently.

The other point very few people talk about is how you intend to use your images. If you are simply going to post images to Facebook, Flickr or online then you can shoot jpg images to your heart’s content. You don’t have to worry so much about storage because you can upload images to Facebook or Flickr during your trip whenever you have a WiFi connection. In fact, if you have a big enough memory card you can shoot thousands of images before you run out of storage. Most travel photographers prefer not to put all their images on one card so they tend to use several smaller cards to store them.


However, if you intend to hang a large print of the Taj Mahal, Angkor Wat or Machu Picchu over
your fireplace mantle, then you will have to shoot RAW so you can come back with a large enough file with greater resolution necessary to produce a big 16x20-inch print. That dramatically changes how much storage space you need. For instance, a 16 gigabyte memory card in a Nikon D7100 can hold about 290 RAW images but more than 2,000 JPG Fine quality Normal size images. If you’re going to shoot RAW make sure you have plenty of memory cards, and if you’re really careful, a portable hard drive on which to back them up.

So here’s my advice. Do your research before you travel to a distant location. Check Google Images, Flickr and Instagram for images of your destination. Then do an inventory of your equipment and how you intend to carry it around with you.

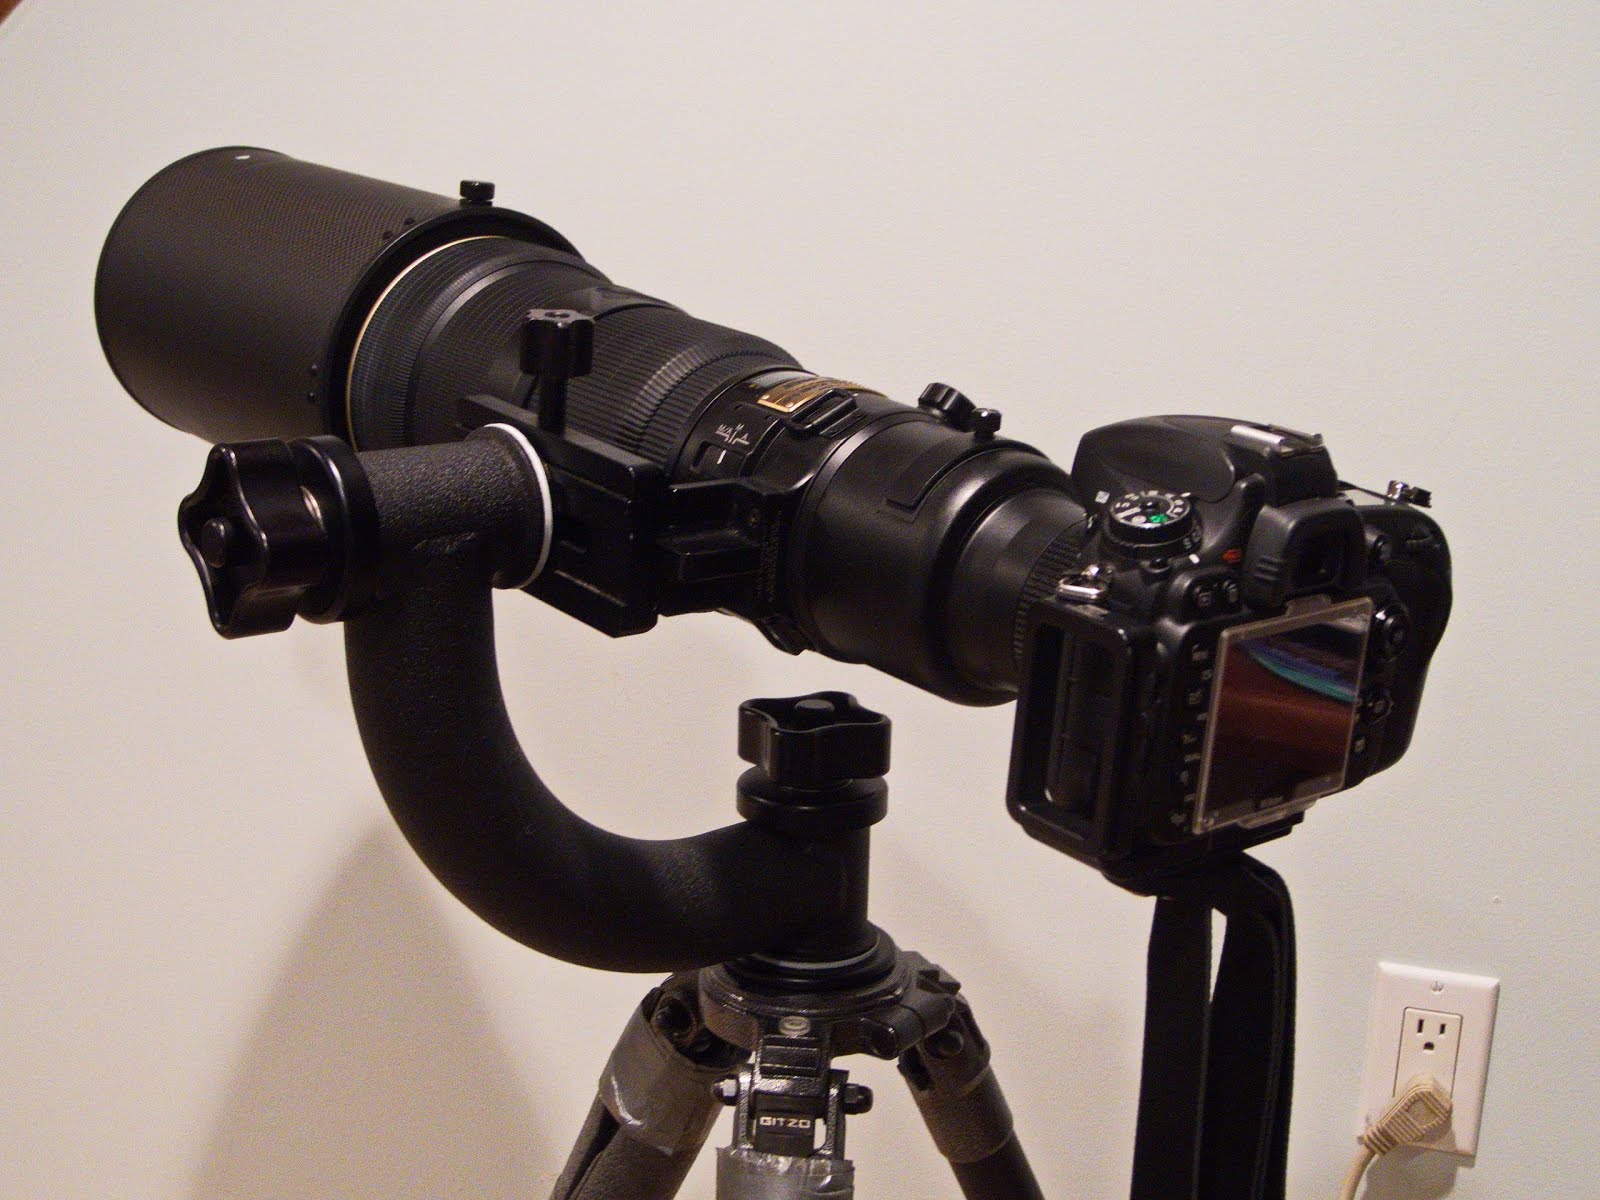
Notice all the equipment this guy is carrying. 


Also decide how much memory you think you will need. Here’s one way to figure it out. During film days, I used to allot 3 rolls of 36 exposure film for each day of shooting. That’s 45 rolls of film for 15 days of shooting. If you use that formula, then you can say that you will shoot around 100 images a day for 15 days. That’s 1,500 images for a 15 day trip. Now double it and you should be safe.

With all the travel and baggage restrictions imposed on us since 9/11, photographers need to plan carefully so they aren’t weighed down by excess equipment, forced to spend time deleting images because they don’t have enough memory, or confronted by conditions that make successful photography unrealistic.

Nov 5, 2013

Get Up Close: Super-Telephoto Lenses

My first venture into serious nature photography was on a trip to Alaska in 2002 where I positioned myself on a “bear proof” stand and looked down at brown bears catching salmon at Brooks Fall in Katmai National Park. I had a Tamron 200-400mm zoom lens and was shooting Kodak slide film on a Nikon F100. The autofocus was slow and of course there was no chimping.


I was on the stand with several pros who sported monster lenses in the 600mm range. That’s when I suffered one of the seven deadly sins--envy! More specifically lens envy! A couple of years later,  I purchased a refurbished Nikon 500mm AFS F/4 telephoto lens. That purchase opened up new possibilities for photographing birds and wildlife in general and has been my go-to wildlife telephoto lens ever since.

Now I could photograph the small birds and the distant wildlife with ease and when I added a 1.4x extender it pushed my capabilities to a monstrous 700mm and the 2x jumped me to 1,000mm. On a cropped sensor camera, I could go to 1,500mm. Even a respectable image of a quick little tufted titmouse was possible.

I recently spent some time with my friend Jeff Gulitz from Long Island Photography Workshop Meetup Group talking about his recent purchase of Canon 600mm lens and we had a long rambling conversation over lunch about the photographic possibilities it opened up for him. He uses the lens on full frame cameras and doesn’t hesitate to use 2x extenders to expand his range and distance. He also pushes the ISO rating so he can shoot at high enough speeds to stop the action.

Below is an image of his setup that includes all the bells and whistles: camo, flash extender, remote trigger, and 2x tele-extender. Though not clearly depicted, Jeff uses a Really Right Stuff articulated gimbal tripod head.

Jeff said that he debated whether to take a chance and purchase a used or refurbished lens, but since he was making the investment, he decided that the newer technology, and the warranty from Canon made the purchase of a new lens worth the extra money.

Jeff didn’t hesitate using the lens. He started by taking photos of birds in his backyard, but then moved out to capture images of surfers at Cupsogue Beach and birds in Sunken Meadows State Park. The images are amazingly sharp and capture the action of crashing waves in the ocean and feeding egrets along the shoreline of the Nissequogue River.

Instead of talking about this, take a look at some of Jeff’s images. You can find all his galleries on his Smug Mug website at J&D Creative Photography. One of the first things Jeff noticed is that it takes some getting used to finding the subject in the frame.


That’s especially true for moving subjects like flying birds or surfers riding a wave. One thing that helps track your subject is using a gimbal tripod head that can move up and down as well as side to side.This makes tracking your subject a lot easier.


Below is a King Cobra gimbal head by Kirk that I use. Notice that the lens foot is attached to the tripod. These large lenses are just too heavy to be supported on the camera’s lens mount alone.


The second thing to consider is that if you decide to use a tele-extender, you will lose an f-stop or two depending on its magnification ratio. For example, an f/4 lens will go to f/5.6 when you add a 1.4x and then jump to f/8 when you add a 2x. Especially on overcast or low-light days where you may encounter fast action birds in flight, you have to increase ISO to maintain shutter speed and to compensate for smaller f/stops.
Most modern DSLR’s and lenses capture sharp images but high ISO’s generate noise especially when you pass the ISO 800 threshold. It’s the in-camera noise reduction that tends to reduce sharpness and is most noticeable when shooting JPG images. So shoot raw images and correct for noise in post-processing.

Depth of field is another concern when you use smaller f/stops. However, with these big telephotos, depth of field is rarely an issue as they have very shallow fields of focus.
Look at Jeff’s image below. The sharpness is incredible despite a 2x extender, and the concomitant smaller f/stop didn’t add any objectionable depth-of-field distractions. Nor does the image suffer from objectionable noise.


Carrying a long lens is another problem. I used to remove the lens from the tripod and carry the camera and lens attached to a sturdy strap over one shoulder and the tripod over the other. I felt like a WWII machine gunner going from bunker to bunker. Now I keep the lens on the tripod, nestle the barrel of the lens and the crook of the gimbal head on my neck and shoulder, and go from one shooting position to another.  If I had to traverse rough terrain, however, I would repack everything in the camera backpack and set up again at the new location.

Wildlife photographers usually benefit from the reach of long telephoto lenses, but when I was in Africa, I never needed more than the 70-200mm and a 1.4x tele-extender. Larger mammals and elephants often came pretty close so I didn’t need to carry the extra weight. However, in New Mexico and British Columbia, it was difficult to get close to mule deer and elk, so the long lens came in handy.  But the 500 mm wasn't enough to get a really good capture of this coyote in Bosque de Apache in New Mexico. (By the time I dug out the 1.4 extender the coyote moved out of sight.)


Generally speaking large mammals--horses, bison, elk, bears--won’t require super-long lenses if you can get relatively close, but almost all wild birds will, unless they land at your feet.

Jeff debated what to purchase and finally decided on the 600mm  because it fit his style of shooting and the subjects he likes to capture. Something heavier than that, like the 800mm, would be too long for what he considers "average" bird and wildlife shooting.

One way to learn which focal length is right for you is to rent lenses from Lens Rental. (LIPW members receive a discount.) Check out their super-telephoto lenses and you will find that a four-day rental of a 600 mm lens may be all you need to get the shots you want. In fact, you can rent a zoom lens like the Sigma 300-800 to see what works for you.

The total cost of my first four cars--two VW’s, a Plymouth and a Mazda--was less than the price of one of these lenses. As I’m writing this, NikonUSA is offering a refurbished 500mm for a savings of about $700 off the price of a new one. All refurbished Nikon cameras, lenses and accessories include a 90-day limited warranty against defects in material and workmanship. With such little discounted from the retail price, you can understand why Jeff decided to get the new one and the extended warranty. By the way, Canon and Nikon include an 800mm f/5.6 lens in their super-telephoto line up. Be prepared to lay out upwards to $18,000 for a new one.

You have to determine how committed you are to wildlife photography before you make a major cash outlay of this sort. But if you’re serious about it, and have aspirations to making the cover of Audubon or National Geographic then a super-telephoto lens could be a valuable addition to your photography arsenal.

##